This article will show you how to track Gravity Form submissions using Google Tag Manager (GTM) to send form submission events and goals to Google Analytics (GA).
Before you start, you will need;
-
Gravity Forms plugin installed, activated, and at least one form embedded onto your website.
-
Google Analytics installed on your website (using the universal analytics UA- method), see: How to Add Google Analytics to your Site on Strattic.
-
Google Tag Manager installed on your website.
⚠️ This tutorial will not work using the latest Google Analytics 4 (GA4)
Step 1: Create GTM Tag #1
The first tag is a few lines of Javascript that listen for the gform_confirmation_loaded event, which occurs when the confirmation message is loaded after the form has been submitted.
This is important because it distinguishes between legitimate and false form submissions, such as when a required form field is left blank.
-
From your Google Tag Manager workspace, go Tags > New
-
Name your Tag – ‘gravityFormsSubmission’
-
Tag Configuration
-
Tag Type: Custom HTML
-
Copy the below code and Paste it into the HTML section of the tag configuration.
<script>
jQuery(document).ready( function() {
jQuery(document).bind('strattic-form-success', function(e){
   var formId = e.detail.form.id
   var formDetails = e.detail.formattedData
window.dataLayer.push({
           'event' : 'gravityFormSubmission',
           'gfformID' : formId,
           'gfformSubmission' : formDetails
});
});
})
</script>
-
4. Triggering: Choose all pages
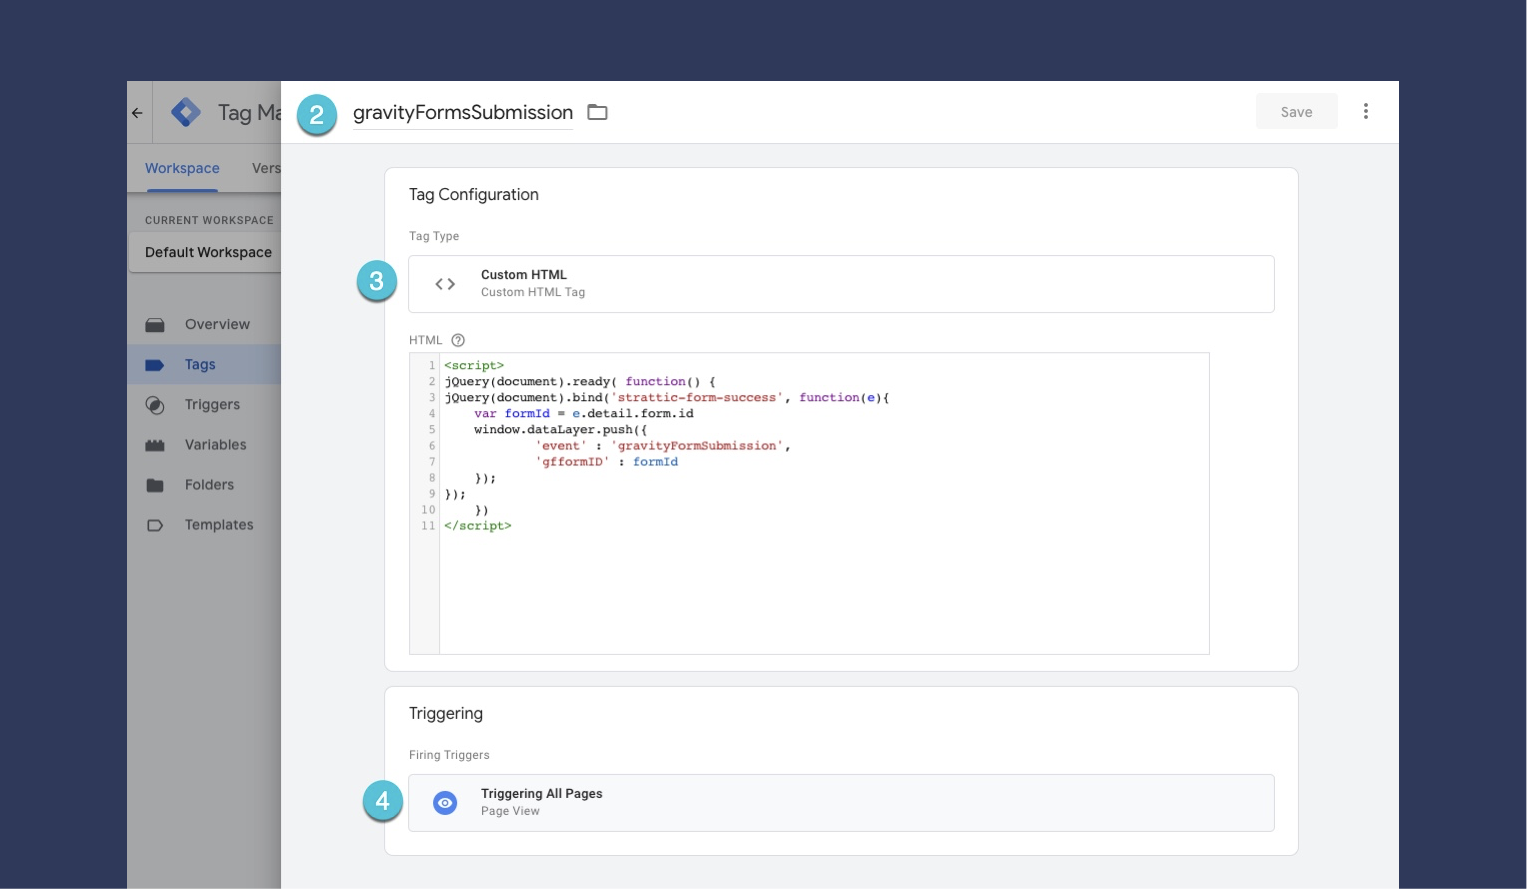
This listens for the strattic-form-success event and fires an event into the Data Layer called “gravityFormSubmission.”
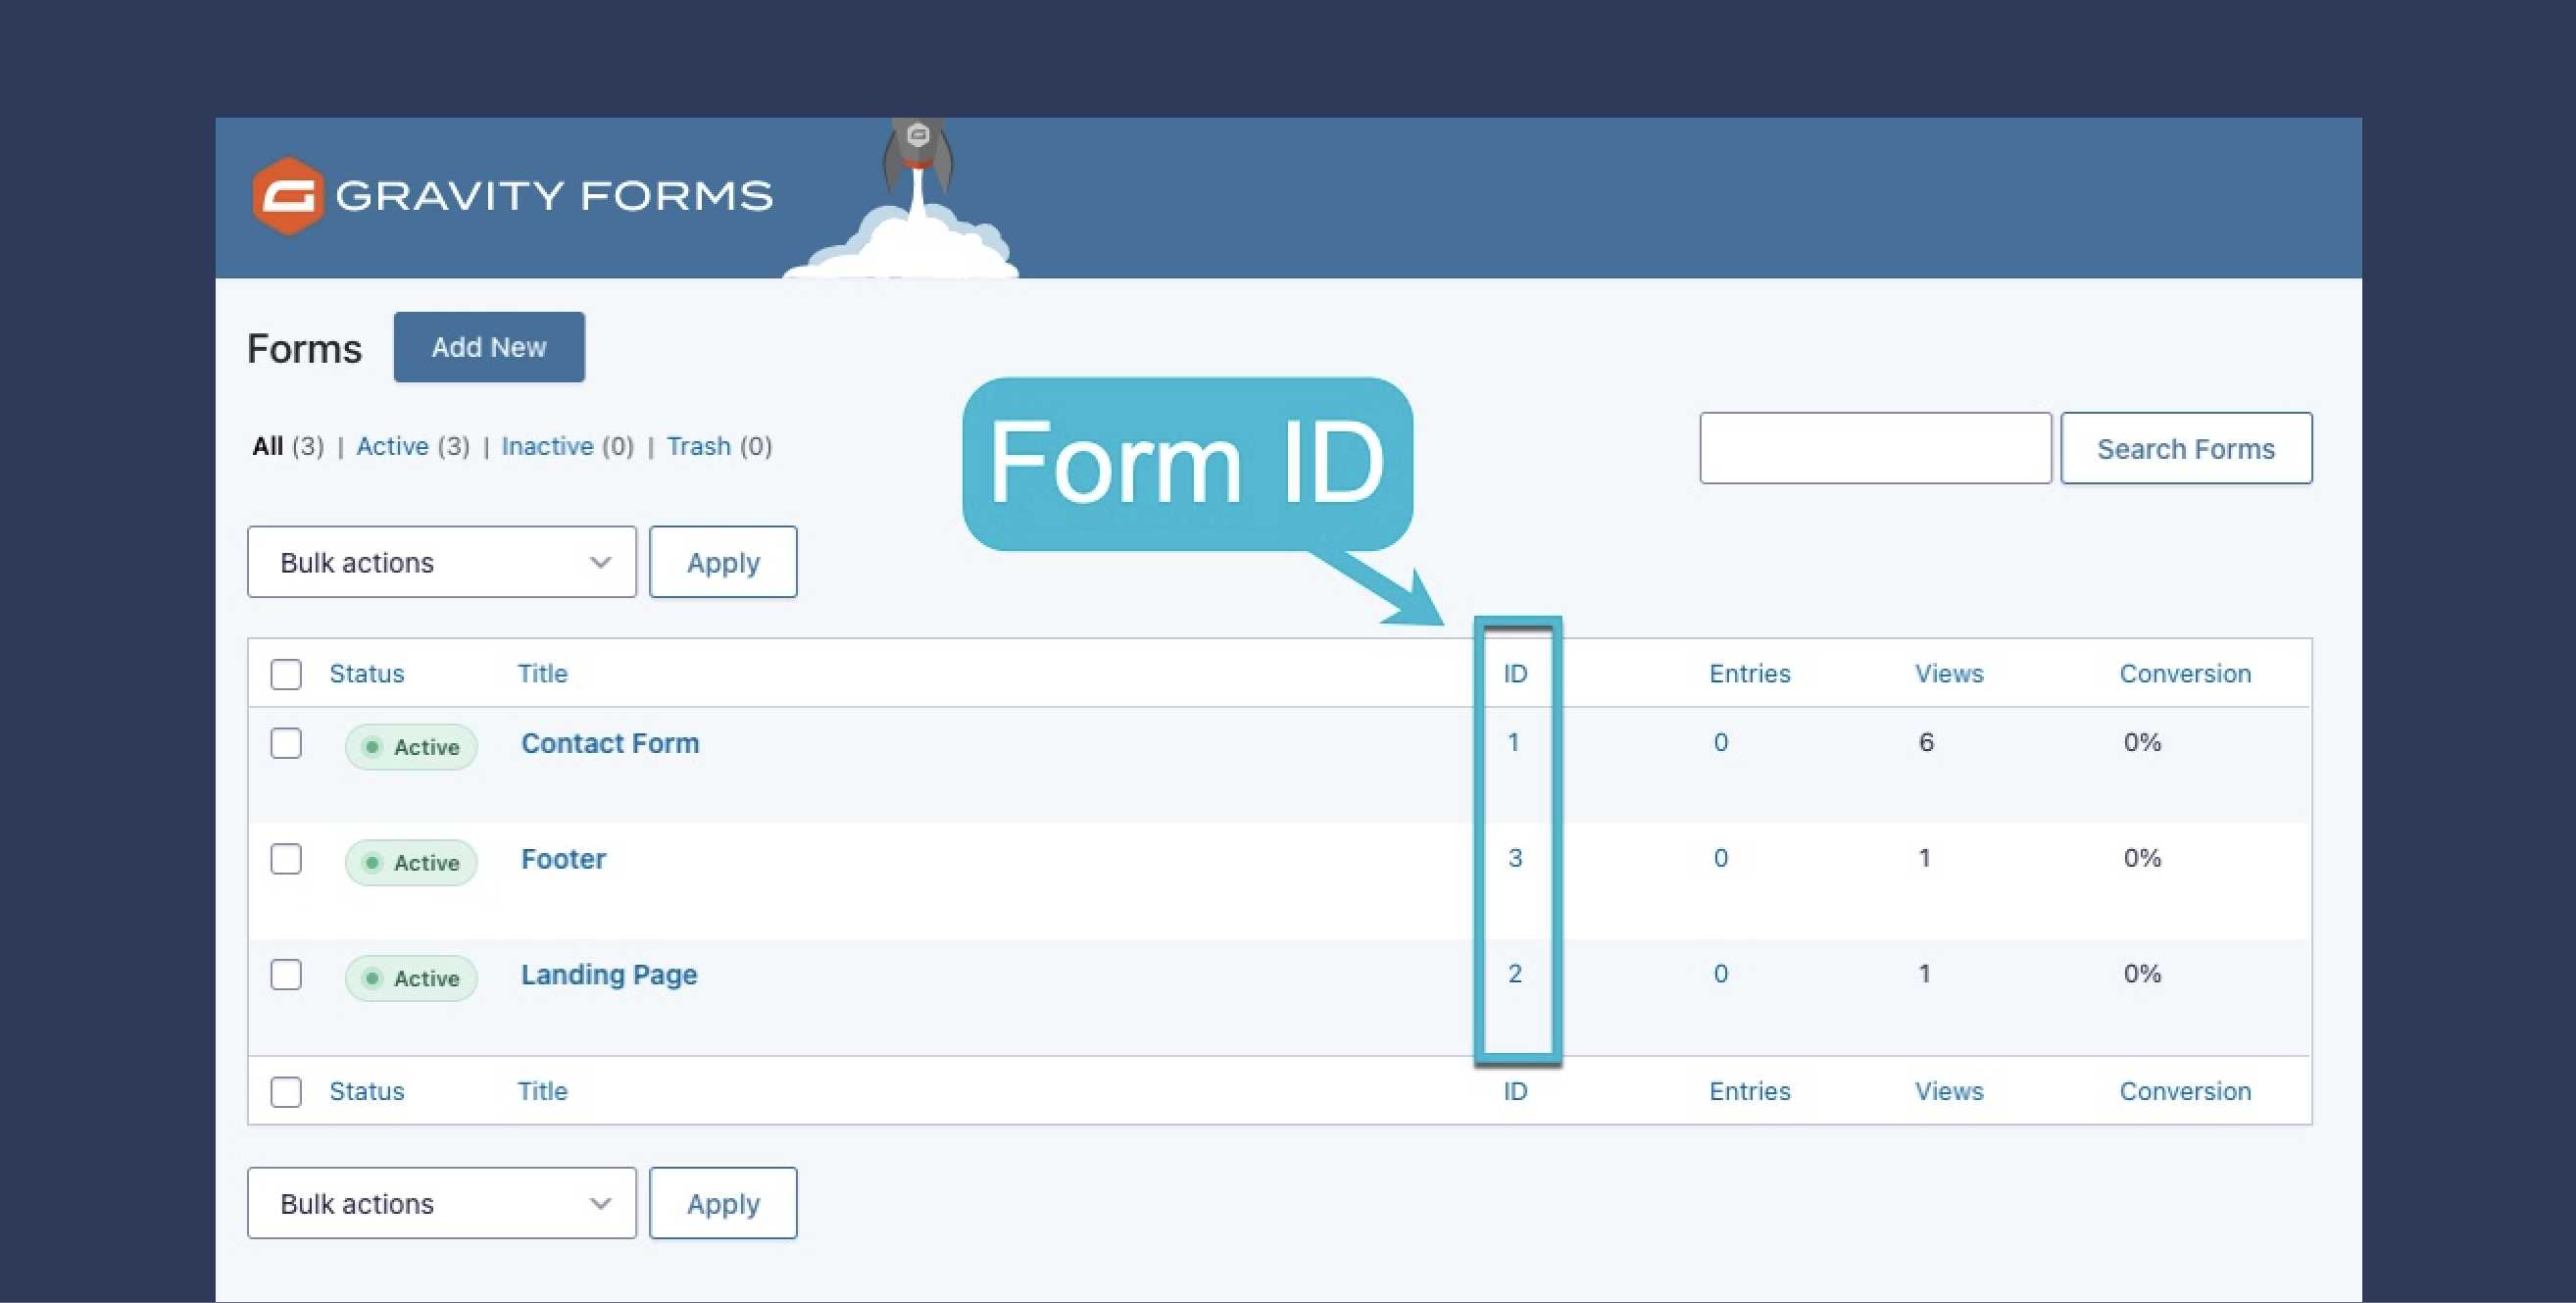
It also gets the form ID in the Gravity Forms shortcode and pushes it into the Data Layer, too; you can see the different form IDs in the screenshot below.
Step 2: Create GTM Trigger
Next, create a Trigger for the Tag you’ve just created. Mine is named Gravity Forms Trigger.
-
Trigger Type: Pick Other – Custom Event from the default list. We’ll use the event we created in Tag #1 as the trigger event.
-
Enter Event Name: gravityFormSubmission
-
This Trigger Fires On All Custom Events
-
Save
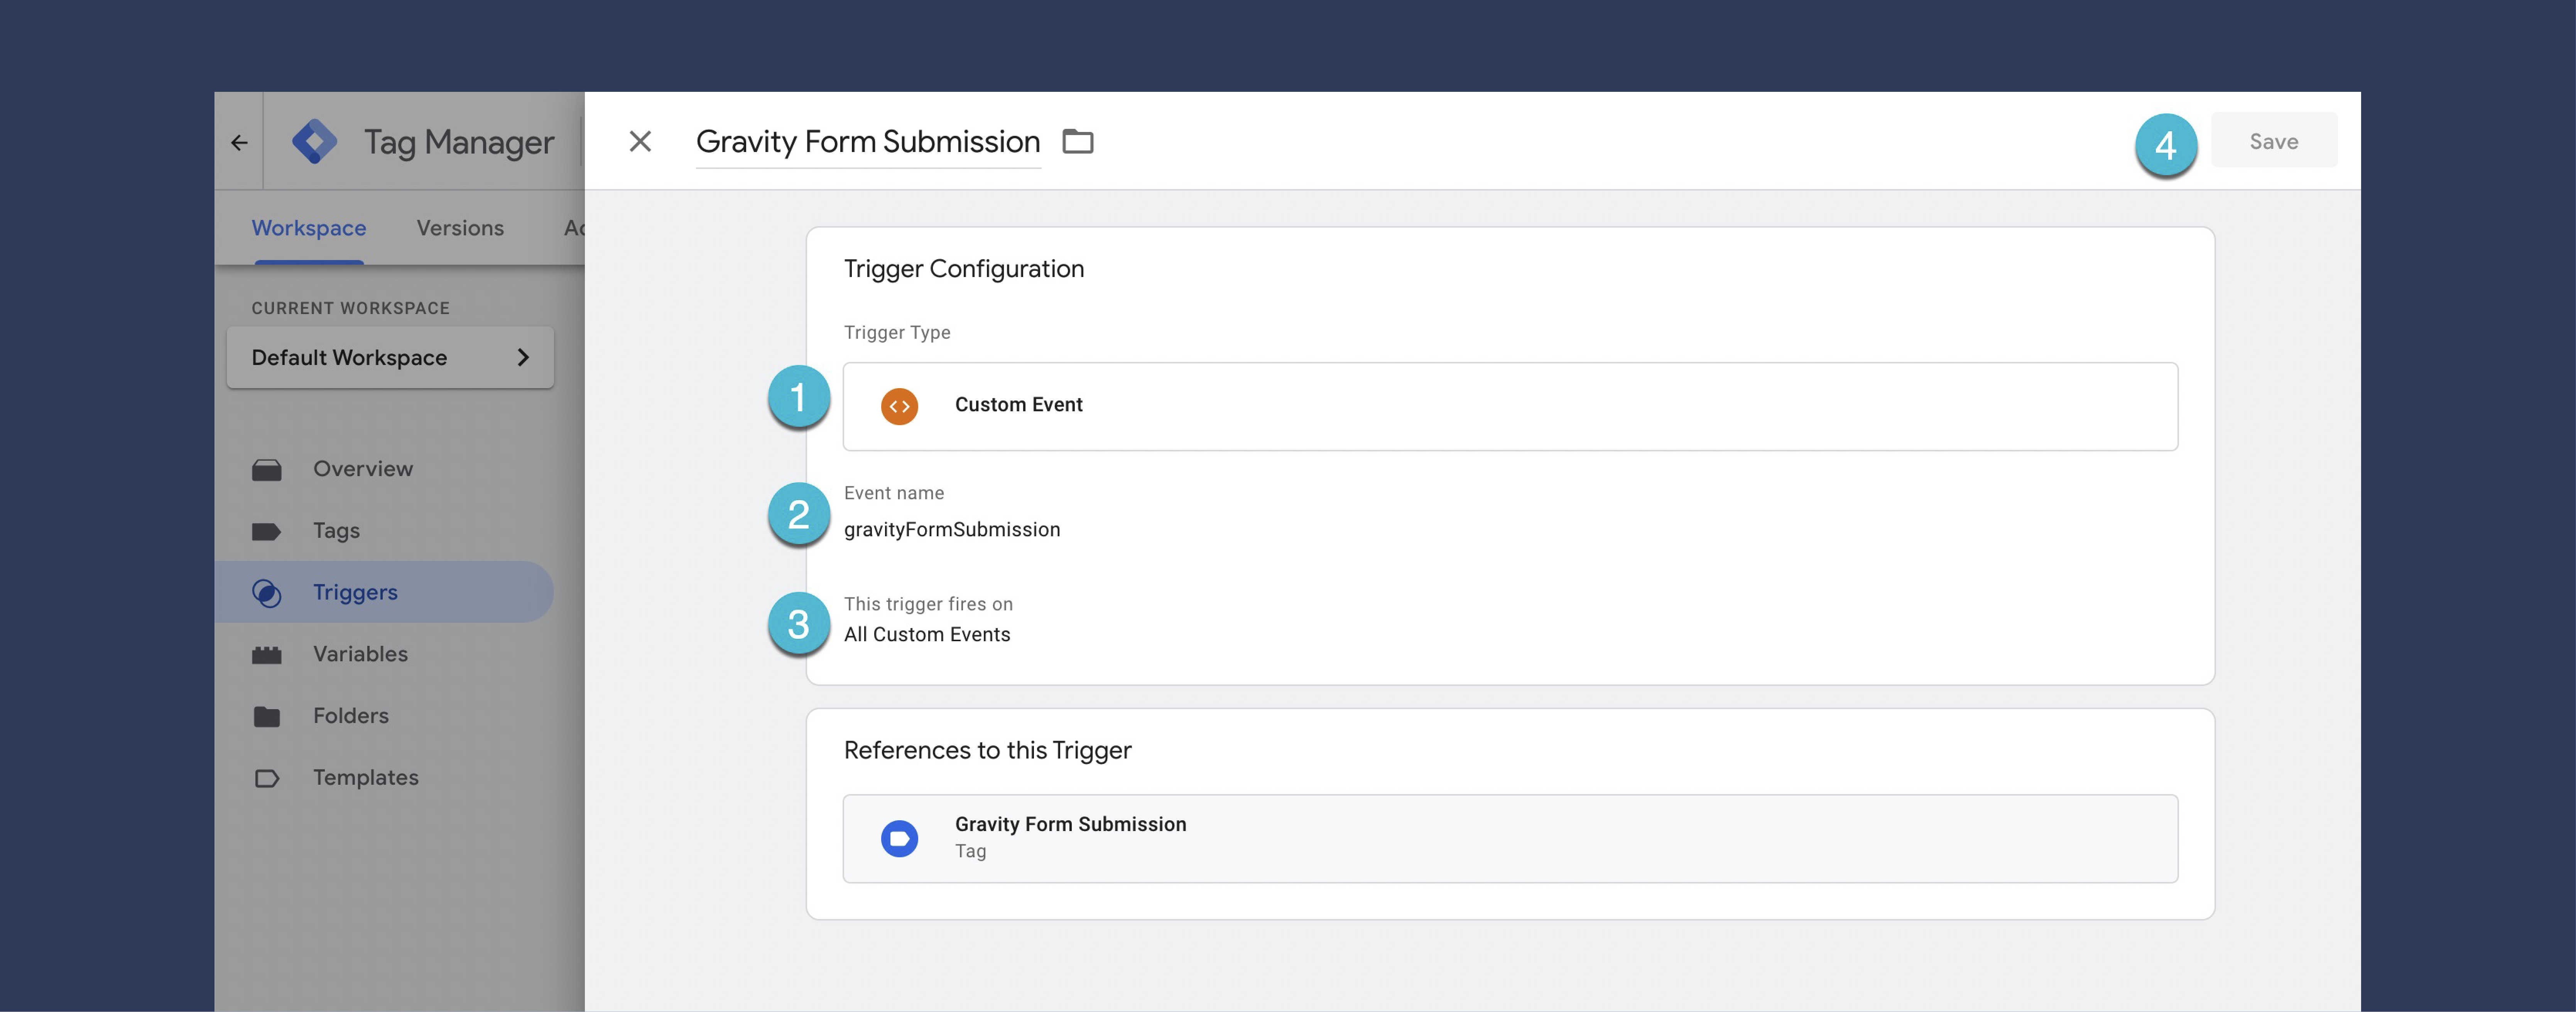
This uses the custom Data Layer event from Step 1 to trigger a Google Analytics event tag that we will set up in Step 3.
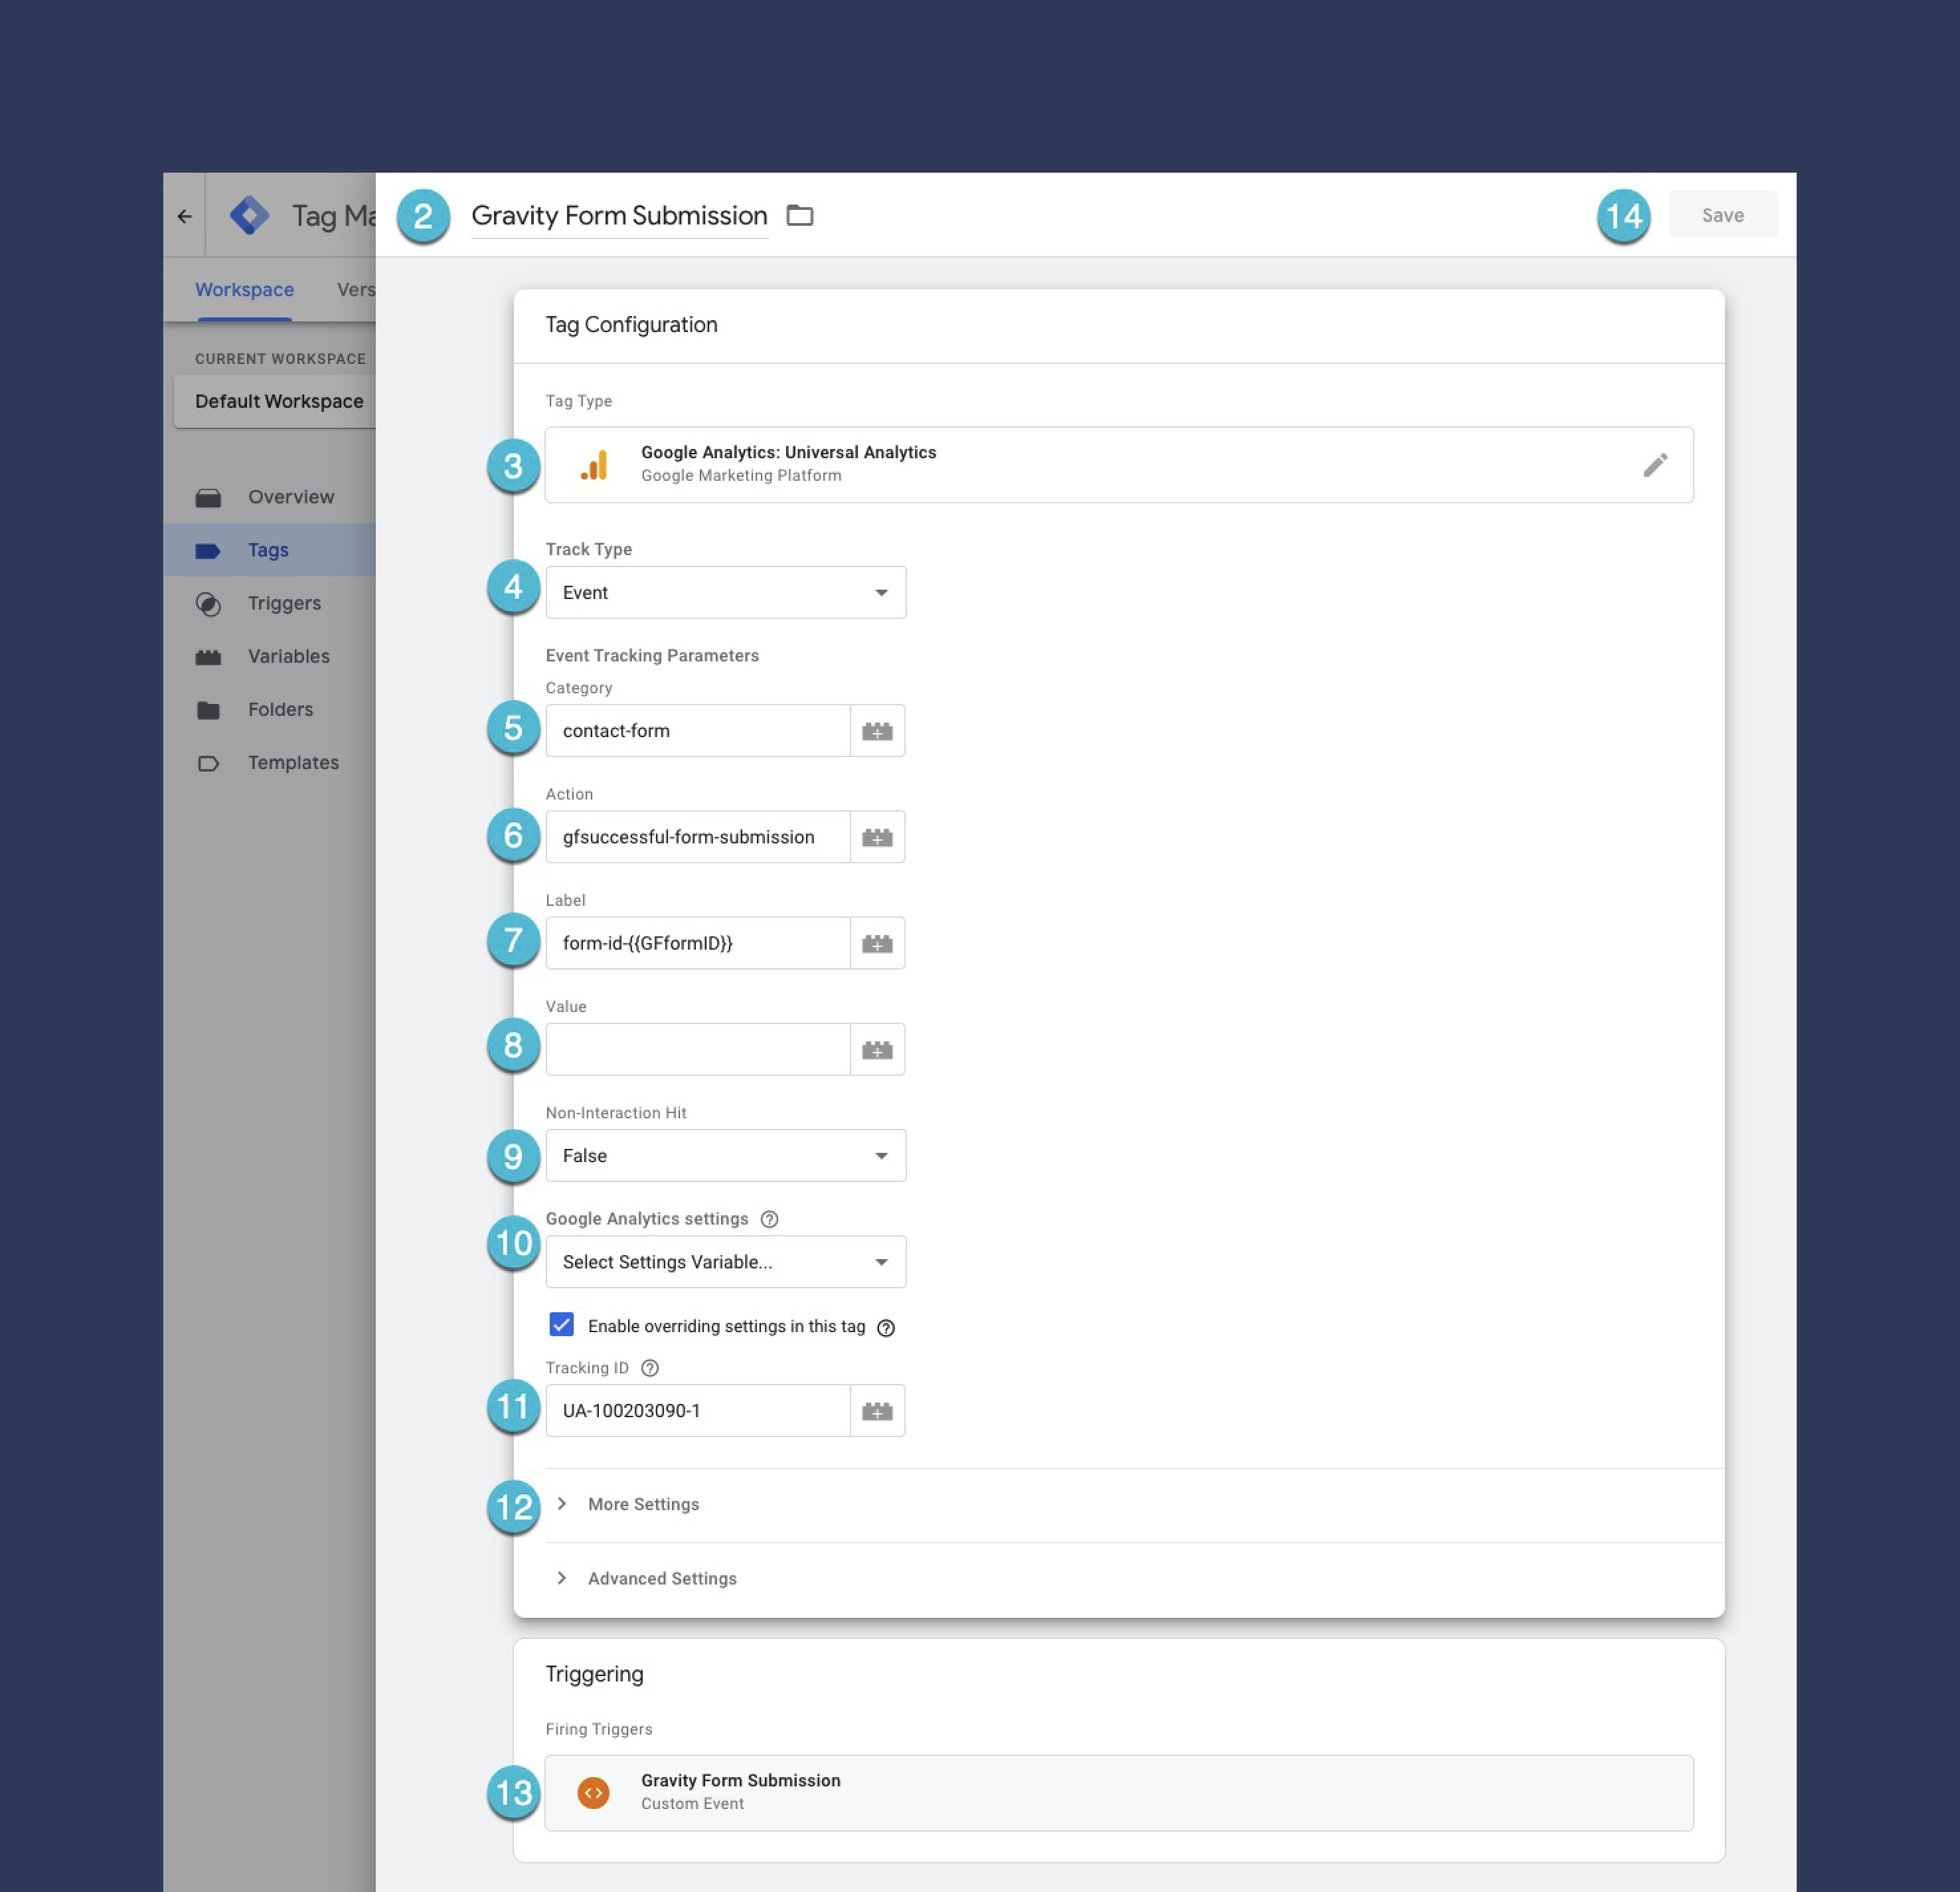
Step 3: Create GTM Tag #2
Next, we will create our second GTM tag;
-
From your Google Tag Manager workspace, go Tags > New
-
Name your Tag – ‘Gravity Form Submission’
-
Tag Type: Universal Analytics
-
Track Type: Event
-
Category: contact-form
-
Action: gfsuccessful-form-submission.
-
Label: If you want to track different forms separately, you need to set this as form-id-#{{GFformID}} and follow the rest of these instructions closely.
-
Value: I did not add a value, but you could add a $ amount if you wish.
-
Non-Interaction Hit: False – this will prevent the session from being counted as a bounce if the visitor only looks at one page but completes a form submission before leaving.
-
Google Analytics setting: leave “Select Settings Variable…” and Tick “Enable overriding settings in this tag.”
-
Tracking ID: Your Google Analytics UA-XXXXXXXX tracking ID.
-
More Settings & Advanced Settings: If you’re an analytics wiz, there are advanced settings in here that you may want to configure. However, I did not change any of them.
-
Firing Triggers: Gravity Form Submission: Custom Event (which we created in step 2)
-
Save
When you’re done, you’ll end up with this:
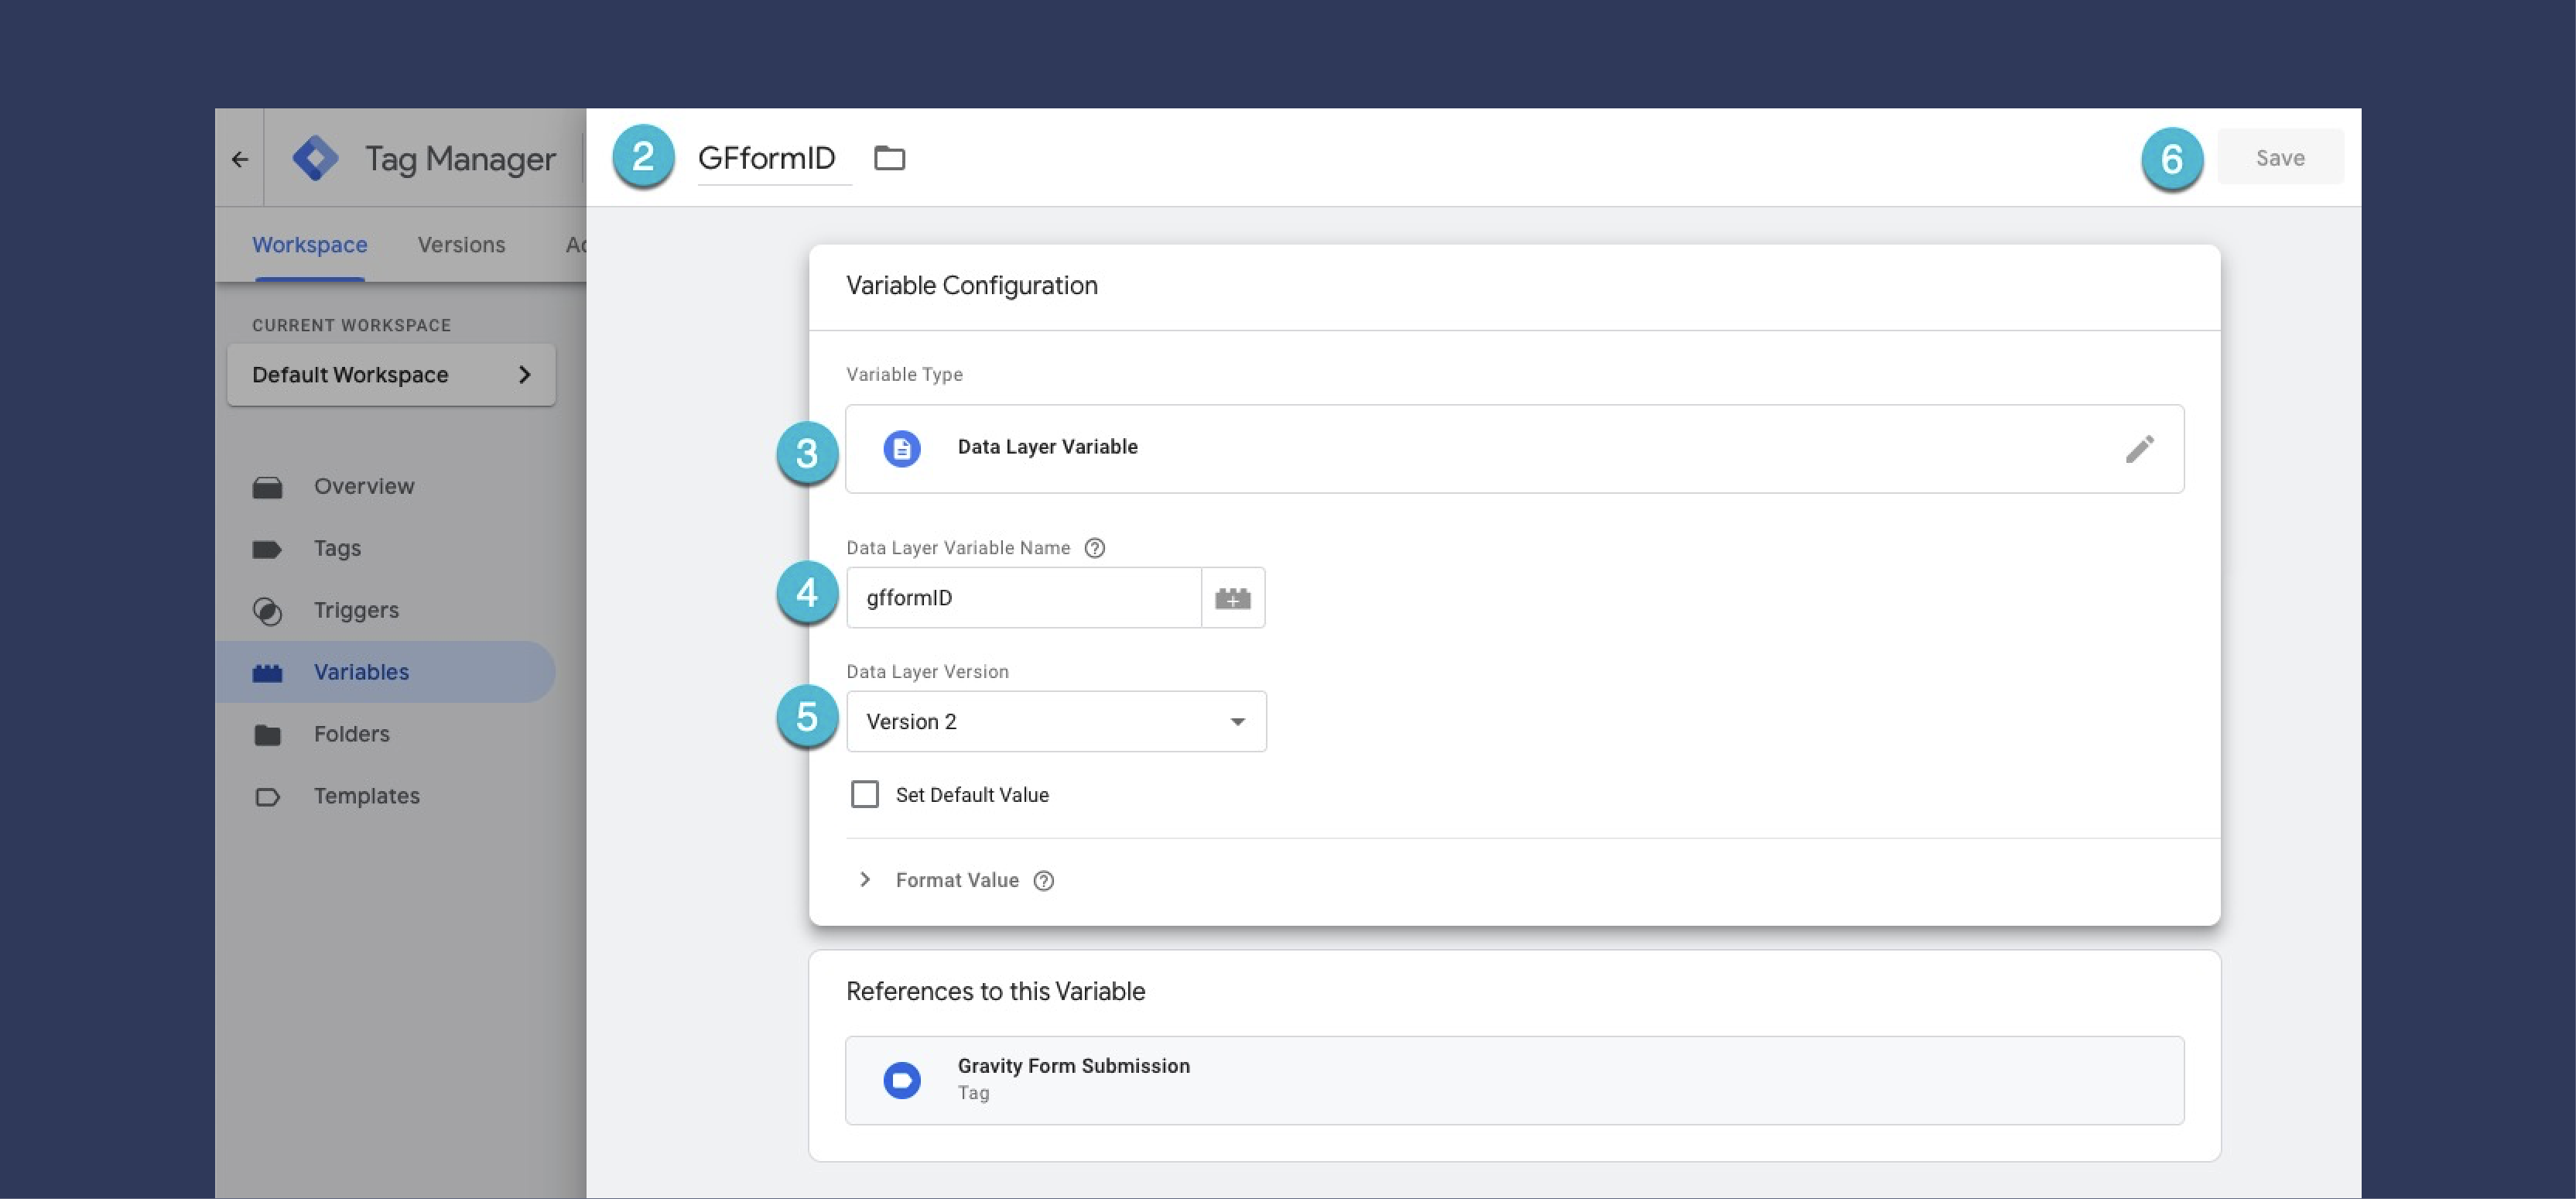
Step 4: Create a Form ID Data Layer Variable
In Step 1, we pushed the form ID into the Data Layer when the form is submitted. Now we need to capture the form ID and get it into GTM and our Google Analytics Events.
-
From your Google Tag Manager workspace, go to Variables, then add a New User-Defined Variable.
-
Name your variable GFformID
-
Variable Type: Data Layer Variable
-
Data Layer Variable Name: gfformID (case sensitive).
-
Data Layer Version: Version 2. Leave set default value unticked.
-
Save
-
Press the blue Submit button to publish your GTM workspace then we’ll move on to setting up Google Analytics goals!
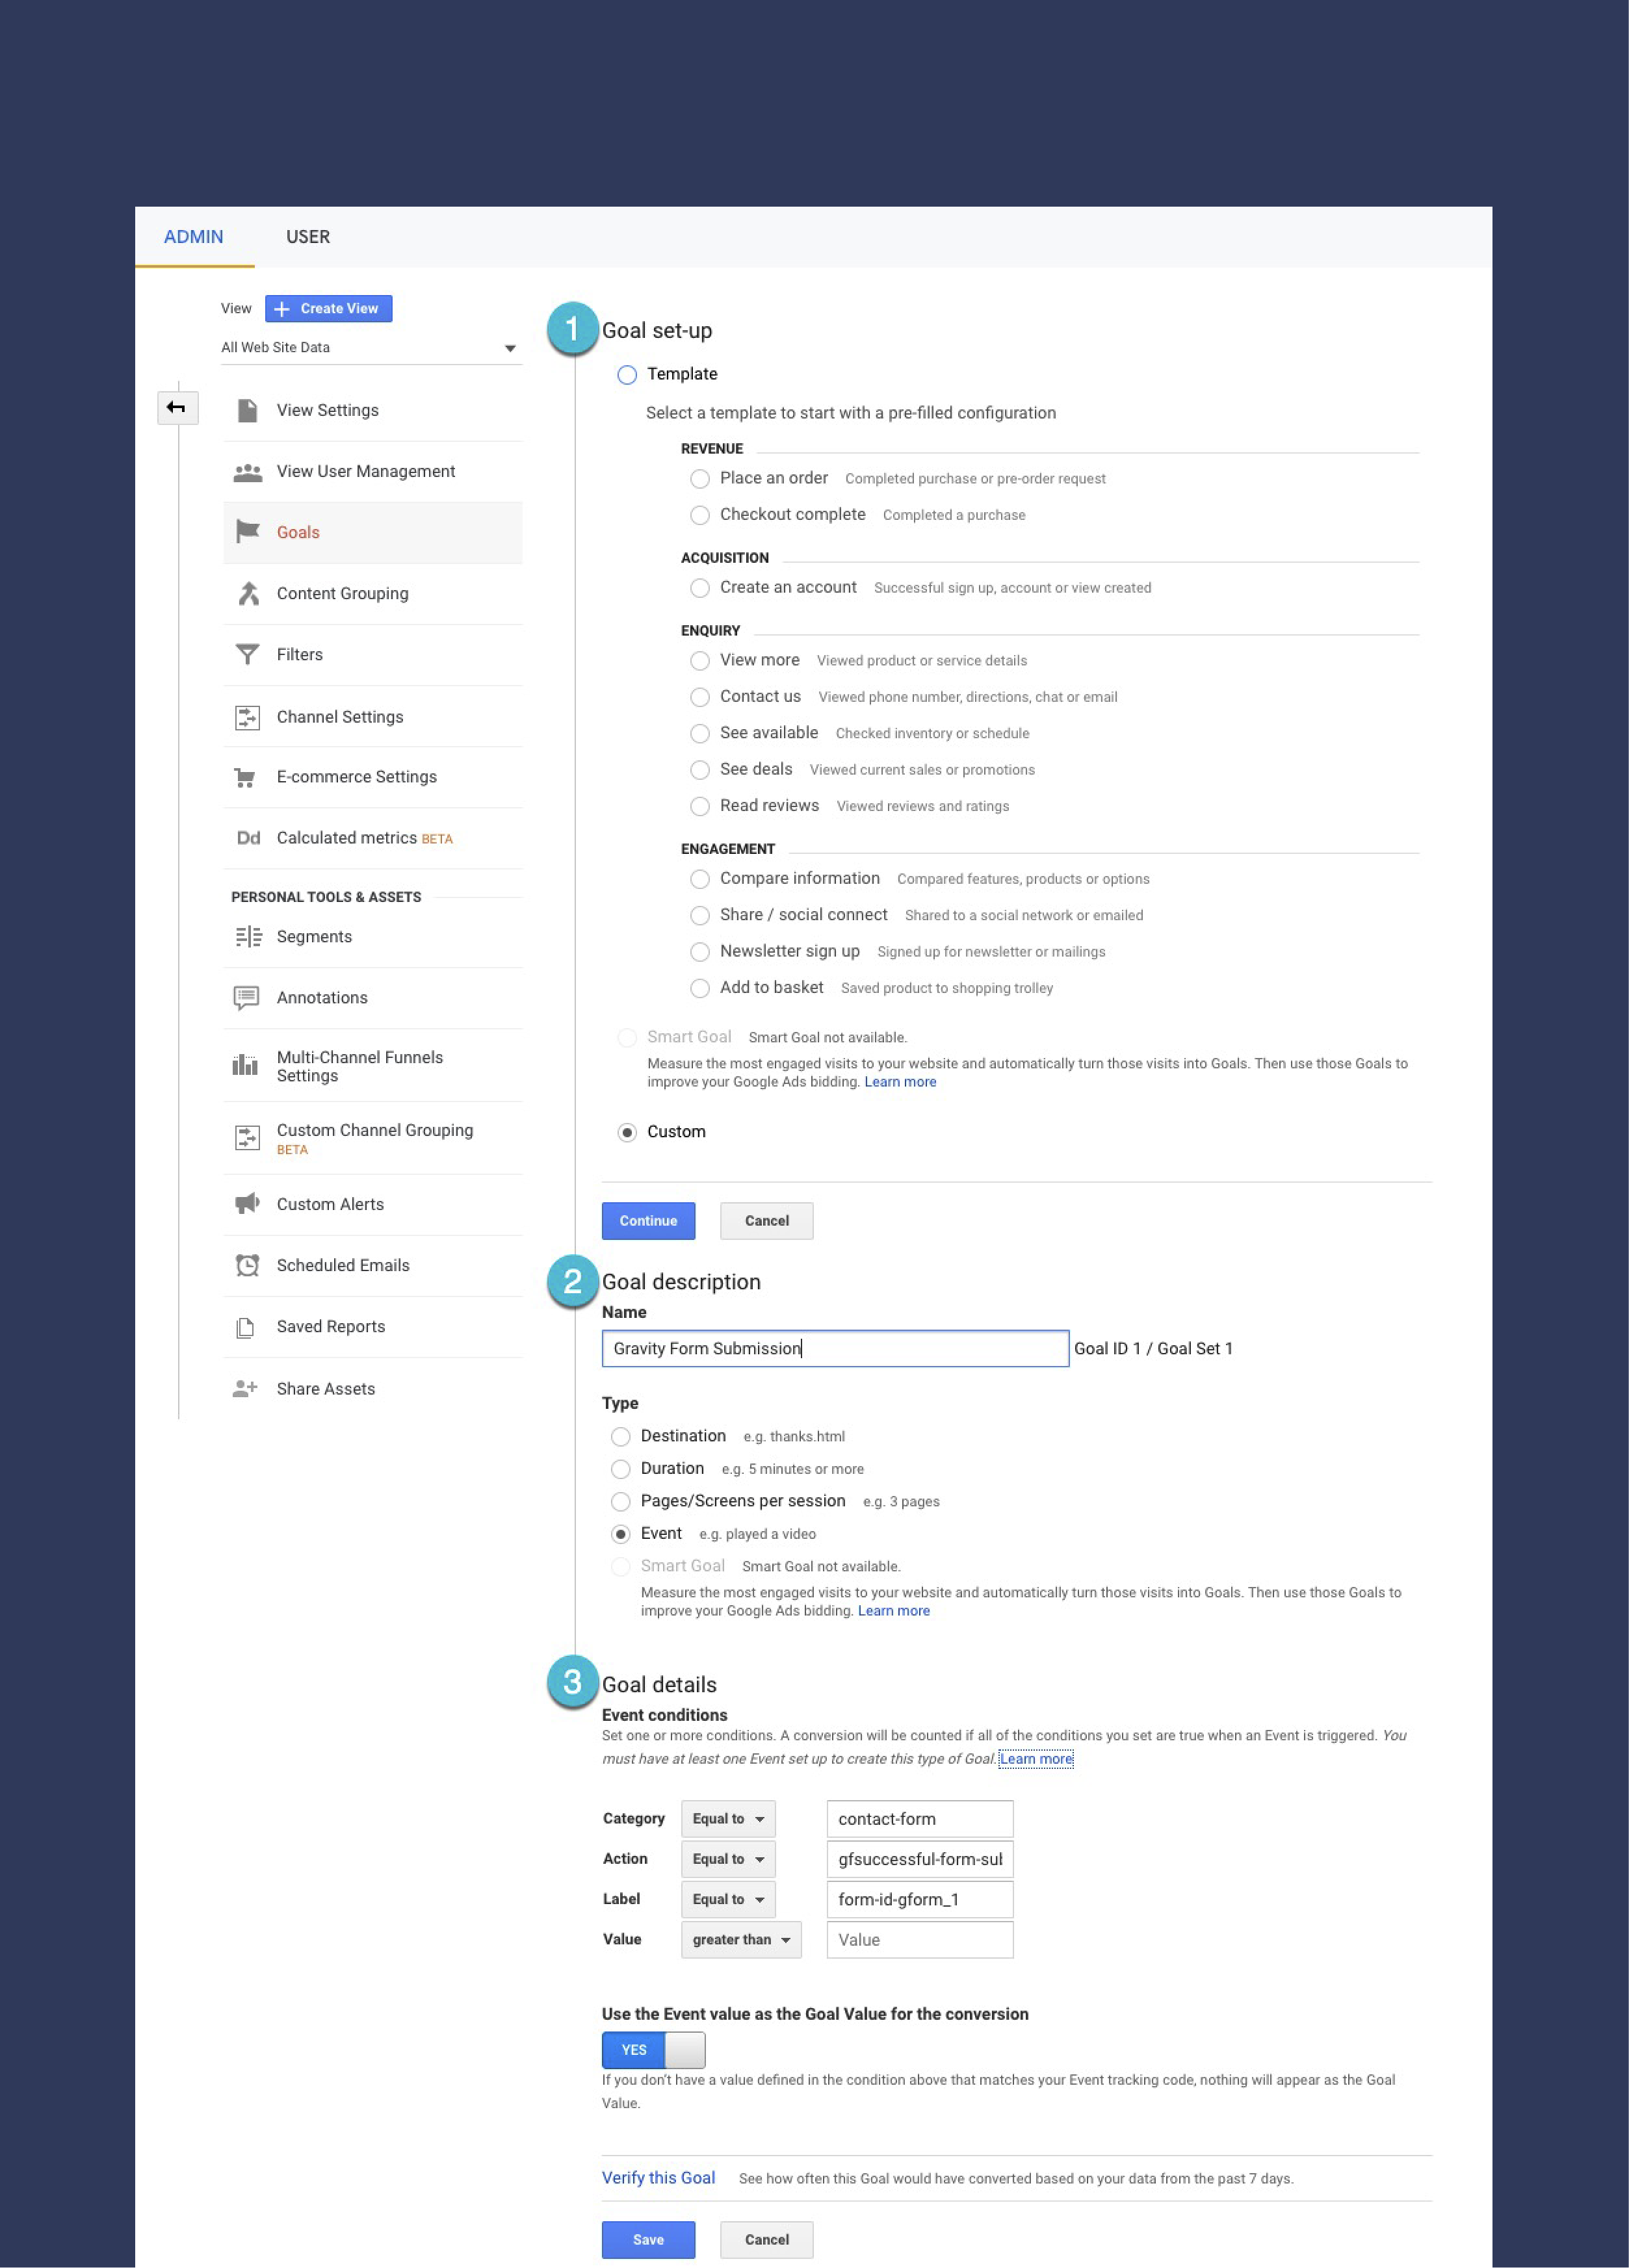
Step 5: Setting up the Goal Conversion(s)
In Google Analytics and navigate to Admin > View > Goals. Click the +New Goal button and set it up as such:
-
Goal setup:
Select Custom -
Goal Description:
Name: Call it whatever you want. This is what it will show in your analytics. I’ve called mine Gravity Form Submission.Type: Select Event.
-
Goal Details:
Category: Equals to > contact-formAction: Equals to > gfsuccessful-form-submission
Label: Select the form ID of the form you want to track. I have entered form-id-gform_1 for the Gravity Form with ID 1
If you don’t want to track different forms separately, you can leave this blank.Value: You can add a monetary value here if you’d like. I have left this blank.
Use the Event Value as the Goal Value: If you set up a Value in ad a value attached to each event, you could set that up here. Since I did not, I will not.
-
Save the Goal Conversion, and you’re done.
If you want to set up other goals for different form IDs, repeat Step 5 but change the Label in the Goal Details to reflect the correct Gravity Form ID number.
Finally, verify the implementation by submitting a few test submissions to the website. You will be able to use Google Analytics real-time reporting to look for events firing and see the goal being tracked under conversations.
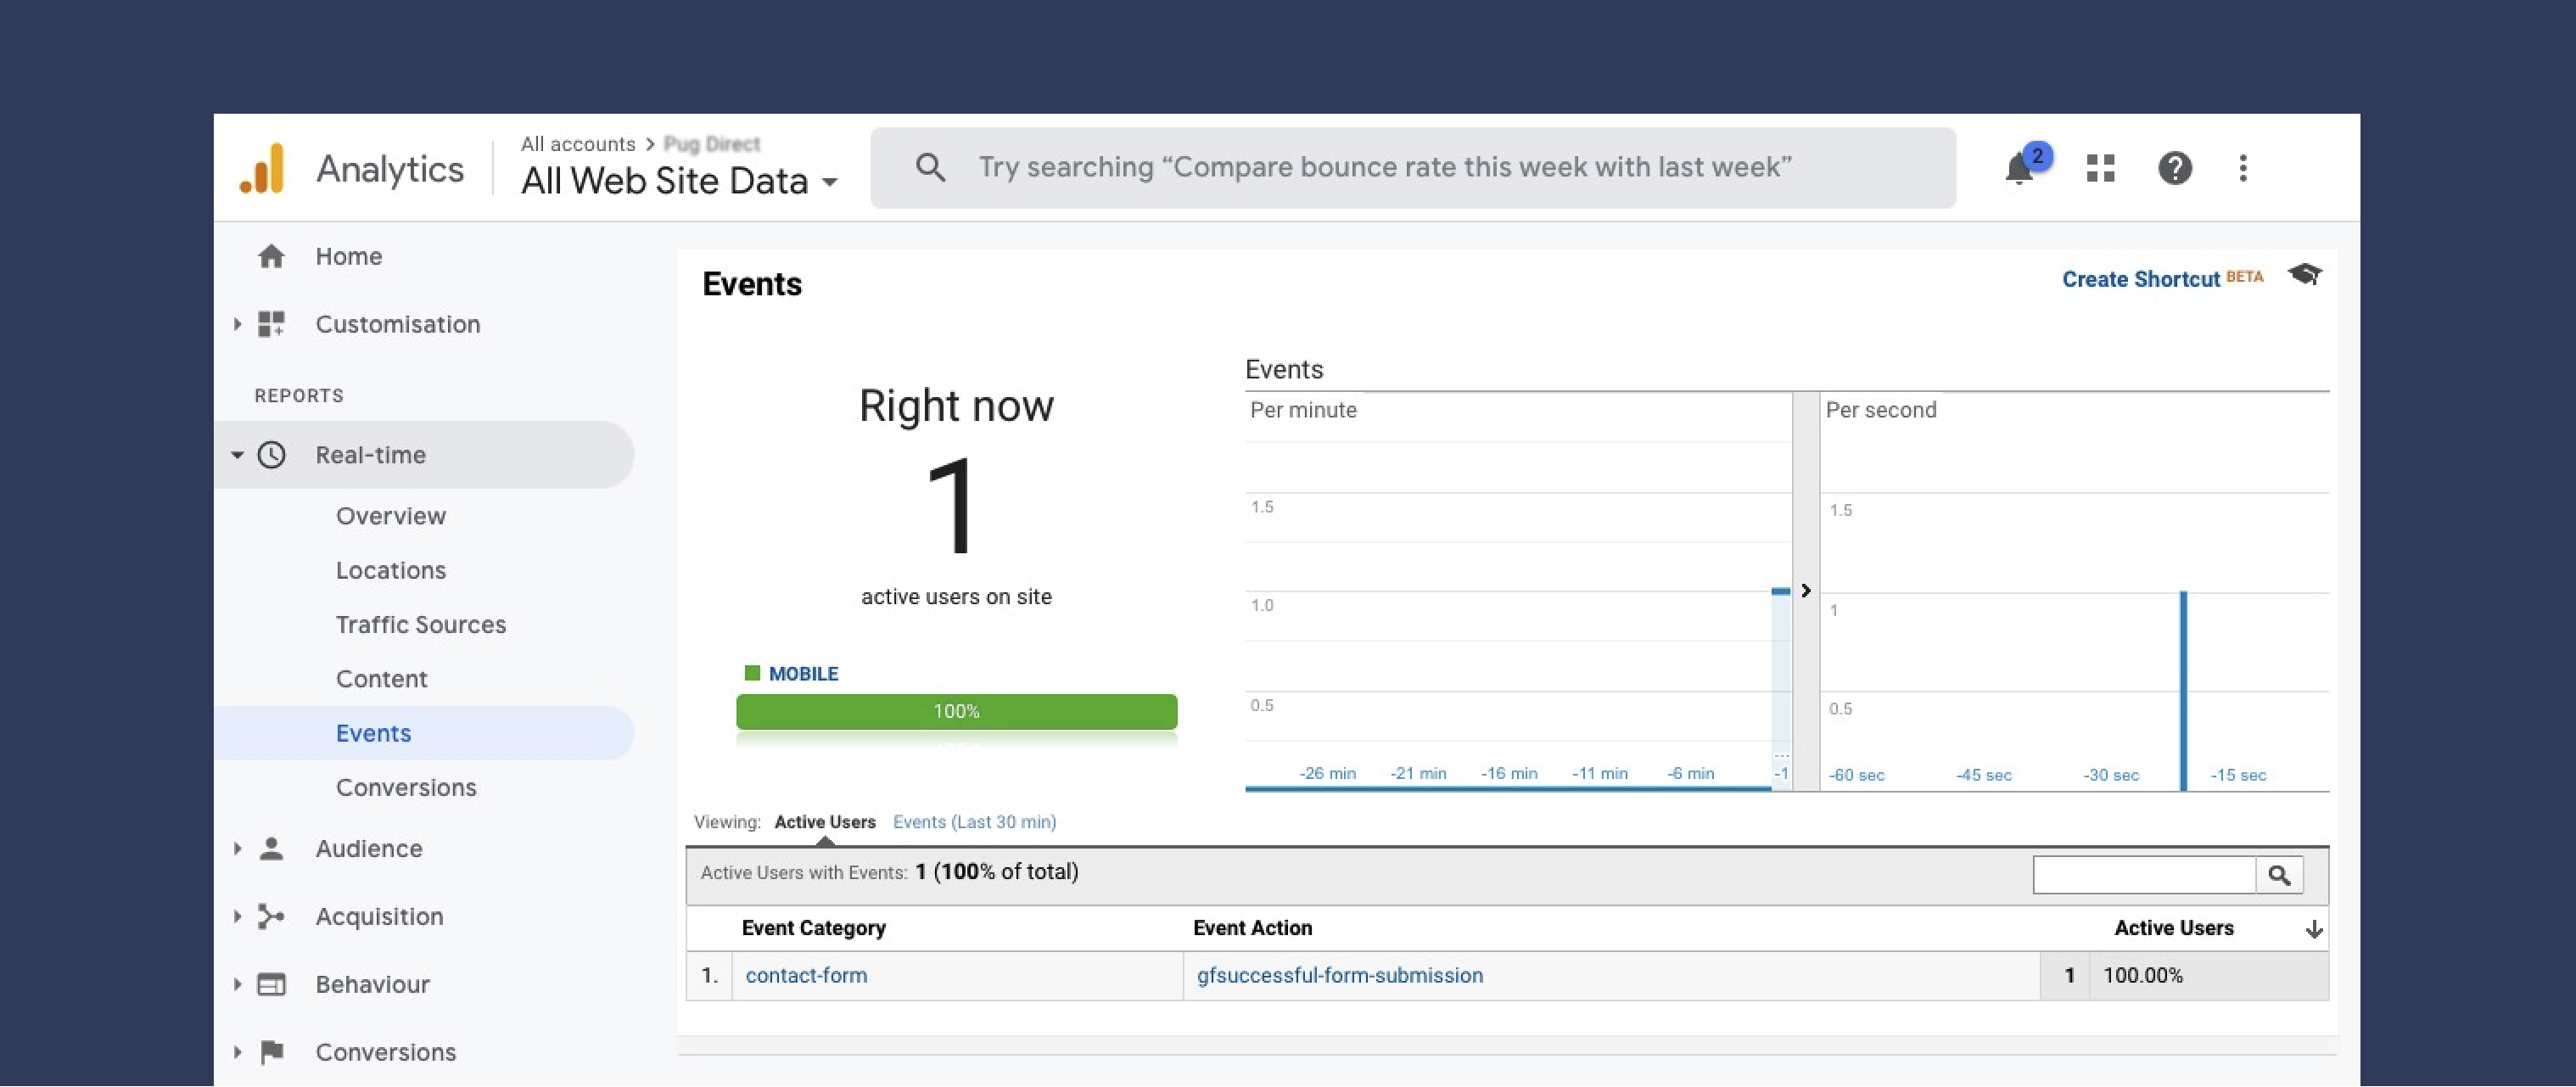
If you don’t see them, make sure your browser’s plugins or opt-out extensions aren’t blocking traffic. For ideal testing conditions, use a totally unfiltered GA view and submit the form on a mobile device using a 3g/4g/5g (no wifi).
That’s it! You are now tracking form submissions from Gravity Forms in Google Analytics. 🎉
What’s Next?
Find out how to track individual gravity form fields in Google Analytics by following our step-by-step guide.
Credit to Chris Berkley for his helpful article on this subject.